Page Contents
Installation Guide
Server/System Requirements
Windows Server 2012/2016/2019/2022 Standard or Core.
1Gb RAM Minimum, 2Gb or higher recommended.
.NET Framework 4.6.2 or higher.
IIS with ASP.NET.
SQL Server 2012 or higher (at least SQL Server 2017 is recommended).
WhosOn Server can be installed on any machine running Windows Server 2012 or later. We recommend a machine with at least a 1GHz processor and 1GB RAM, but this should be increased by at least double if you are planning to host your database on the same machine.
WhosOn requires IIS to run, if you have not installed this prior to installing WhosOn, the installation package will download/install IIS and any necessary Windows roles and features automatically for you, this may present prompts during the installation process.
WhosOn requires a SQL Server database to store data. Following the installation, you will have the option to download and install the free SQL Server Express to use for your database, or you can connect to any existing SQL Server instance.
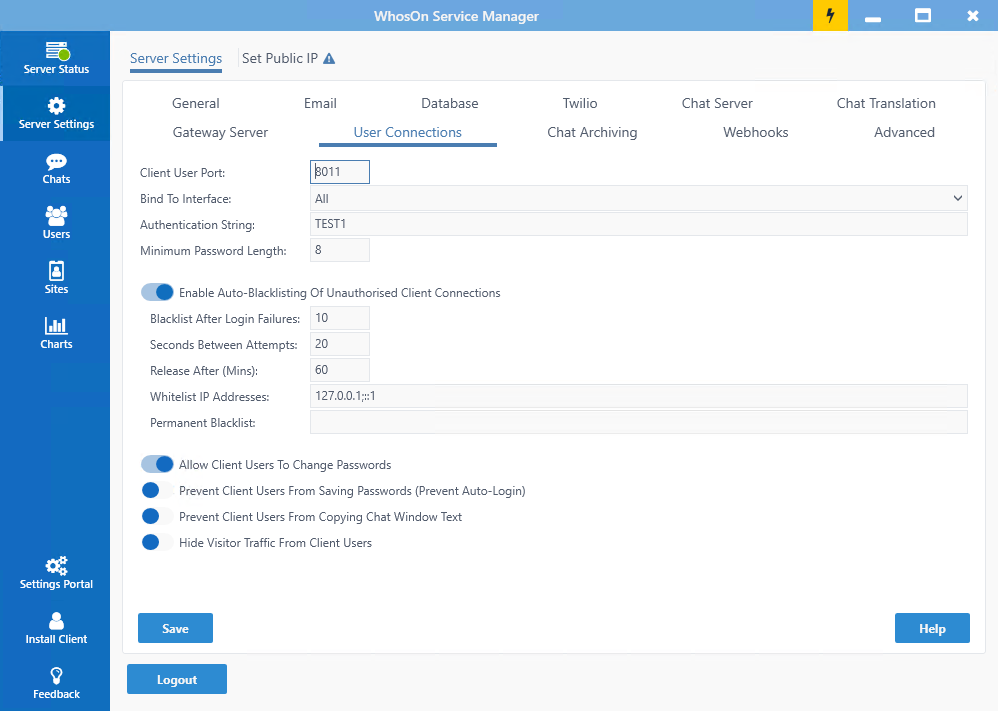
For WhosOn to work outside your server, you will need to make sure that certain ports are open to any external router firewalls. With the default setup for WhosOn, you would need to open ports 80, 443, 8080 and 8443 for external chat and tracking, and port 8011 for the WhosOn Client program to connect to the server. These can be changed within the Service Manager if necessary. The WhosOn installer will open these ports in the local Windows Server firewall during the installation process.
Providing that the above criteria are met, WhosOn can run on any physical, virtualised or cloud environment.
We recommend not running any unnecessary programs or applications on the same machine as WhosOn (other than SQL Server when using a local database, bearing in mind that overall performance may be affected) to ensure that WhosOn has access to the resources it needs and that its services and components are able to run correctly.
Installation
If you are installing WhosOn onto a machine with no internet access you will need to ensure that the following products are installed prior to installing WhosOn. Advanced Pre-requisites
You will receive a link to download WhosOn in your Welcome email, but you can always download the latest version from our downloads page.
Check our Releases site to ensure that you have the current build, and for a history of changes.
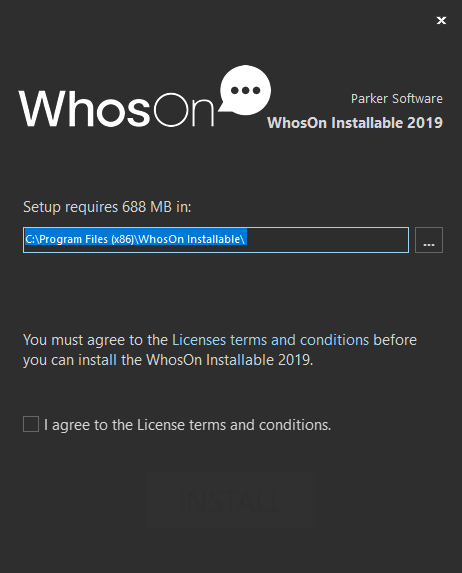
Running the installer will begin the installation process. During the installation of WhosOn, the installer will install any required Windows roles and features. This includes the correct versions of .Net components, and any IIS features as required.
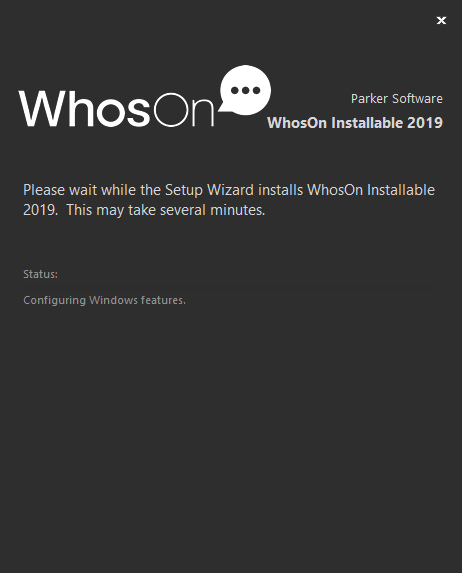
It’s important to monitor the installer as it progresses, as there may be other installer windows or prompts that need to be accepted to continue.
Registration
For WhosOn to run correctly it must be registered, using a serial key provided during a trial or following your purchase.
You will be prompted for your registration details when attempting to run WhosOn following the installation. These must be entered exactly as provided and are case sensitive. Once you have entered your details, WhosOn will connect to the Internet to attempt to automatically verify your details.
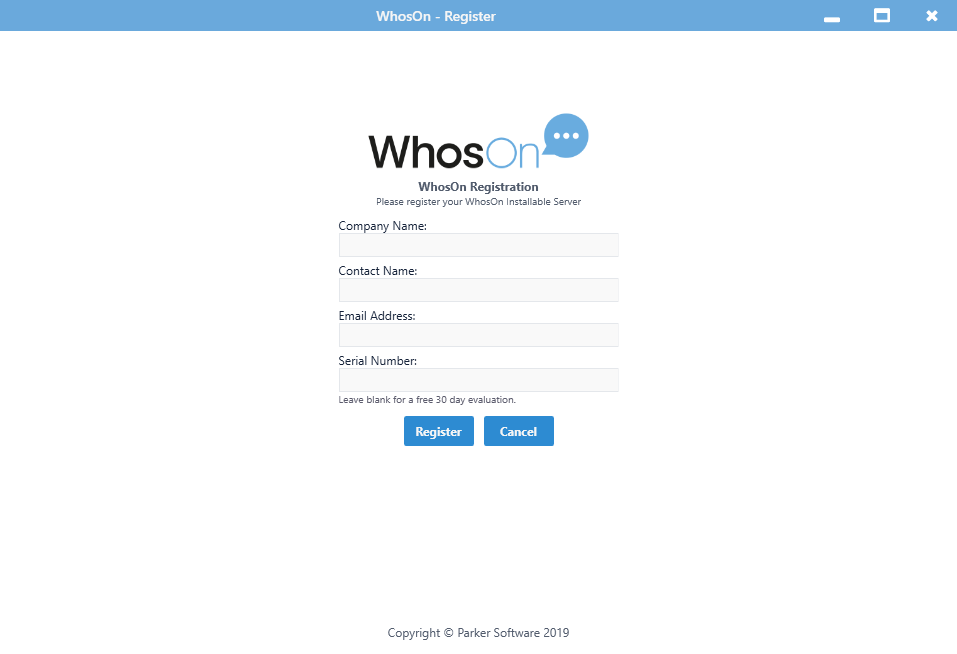
If your machine is not able to connect to the Internet, the Registration Wizard will ask for an unlock code. You can generate an unlock code from any browser with Internet access here, and you can then enter that into WhosOn to complete the registration process.
If you are registering with an existing serial key, the details that you enter for the company name and email address must exactly match the details that have already been recorded. All fields in the registration process are case and punctuation sensitive. If you receive a message stating that the product has already been registered to another customer, this will mean that the details you are entering to register with do not match the details on your account.
You may email Customer Services or contact us via our Live Chat using the button on the bottom right of the page, or on our website if you are having trouble with your details.
First Run
The first time that you run the WhosOn Service Manager following a successful registration, you will be prompted to create a System Administrator account. This is the account that will be used to access the WhosOn Service Manager. It can also be used to access the Settings Portal, Data portal, and the WhosOn Clients. The System Administrator account will have special privileges within the Settings Portal not available to other Admin users, in that you will always be able to see the settings for all sites on the server (other Admin accounts will only see their assigned sites).
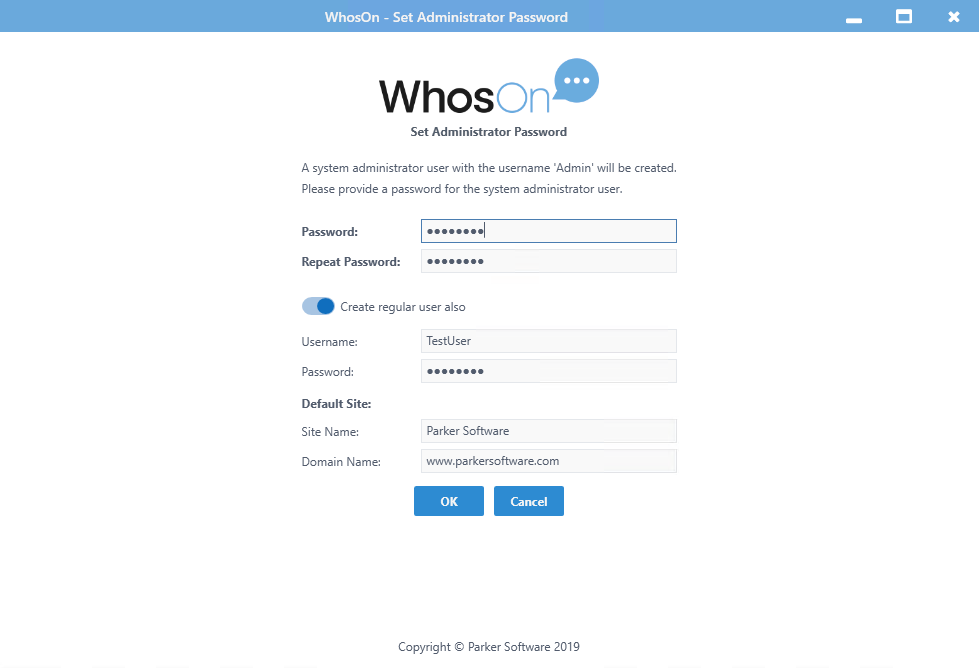
In addition to a System Administrator account, you will be asked if you would like to create a regular user account. This can be used to access the Settings Portal and WhosOn Clients. If you do not create a user account now, you can do it later via the Settings Portal.
You will also be asked to create a site to be monitored. You can edit monitored sites, as well as add new ones, later via the Settings Portal. Even if the domain of the site that is created here does not match the domain of your actual site, it can still be used for setup and testing.
Before running the WhosOn services, you will need to connect to a SQL Server database. This could be an existing database, or a copy of SQL Server Express that can be downloaded from the database connection screen. You can connect to your database at any time using the Database Connection Wizard from the Server Settings menu. If you are using an existing SQL Server instance, enter the details into the Wizard and WhosOn will create a database to be used. If you are connecting to a SQL Server Express instance that you installed from inside WhosOn, you can leave the Wizard options at their default to create a local database.
WhosOn will create the database for you, in order for it to do this the SQL user you specify in the database
connection screen will need permission to make new databases within your environment.
If you wish to set up the database in advance you can obtain the creation scripts by contacting our support desk.
Once the database is connected we'd recommend that WhosOn's database user is db_owner of the WhosOn
database.
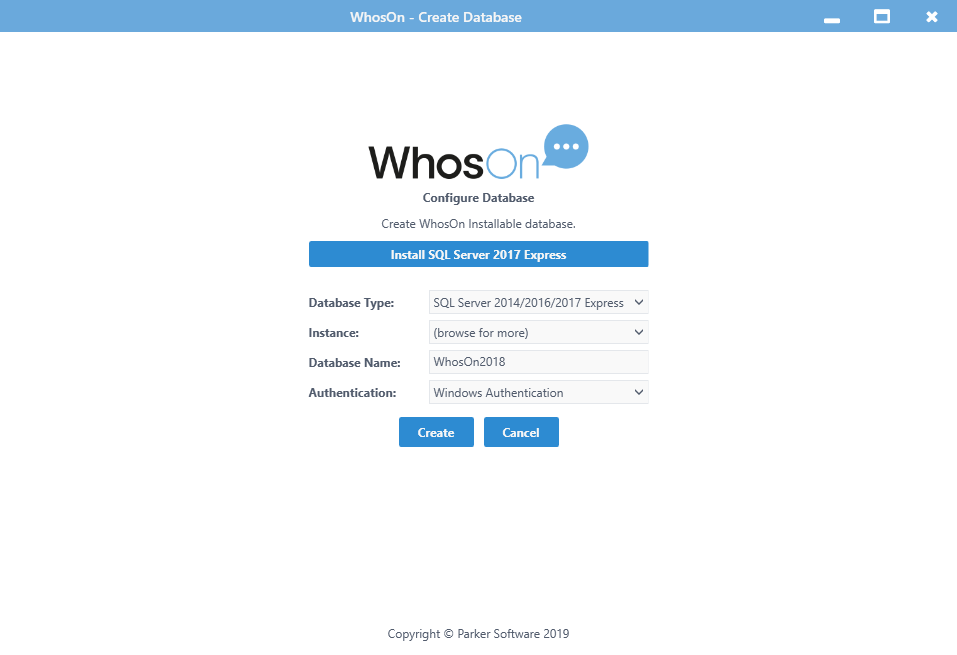
Once the database is connected, the WhosOn services will automatically start.
After starting the services, you can switch to the Server Log view to monitor the services starting.
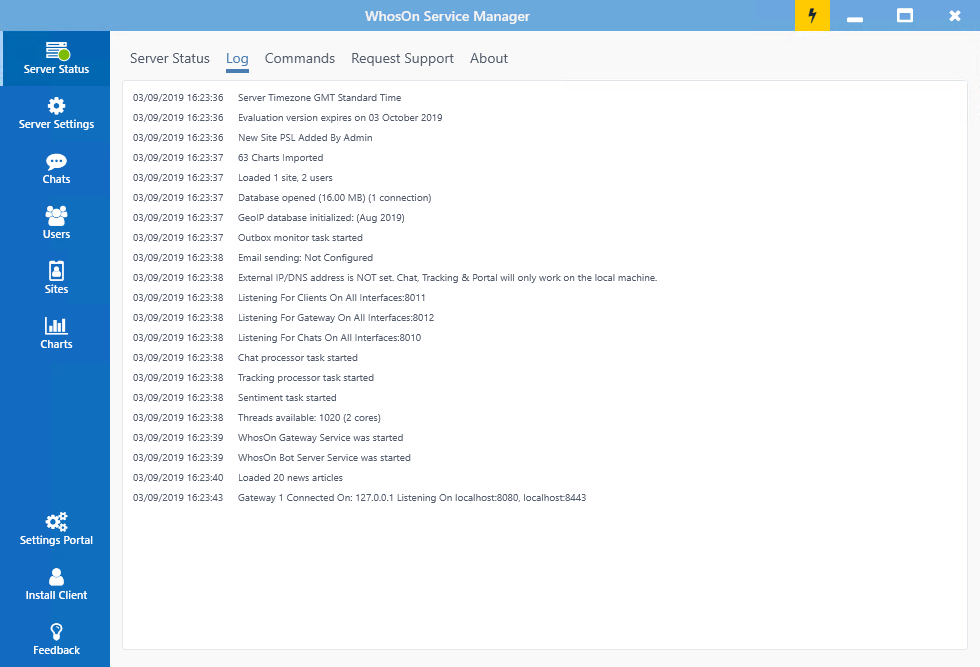
You will see messages regarding the following services and tasks, as well as other general log messages:
If you do see any errors, make a note of these, the log file is in
C:\ProgramData\Parker Software\WhosOnV7 for your convenience
Database connection
The database is required for WhosOn to work, if the database cannot be opened then WhosOn will not start. Any errors here must be corrected in the database connection wizard or inside the database itself.
Gateway connection
The WhosOn Gateway serves any web content required for WhosOn to work. This includes the ability to track visitors and show the chat button on your pages.
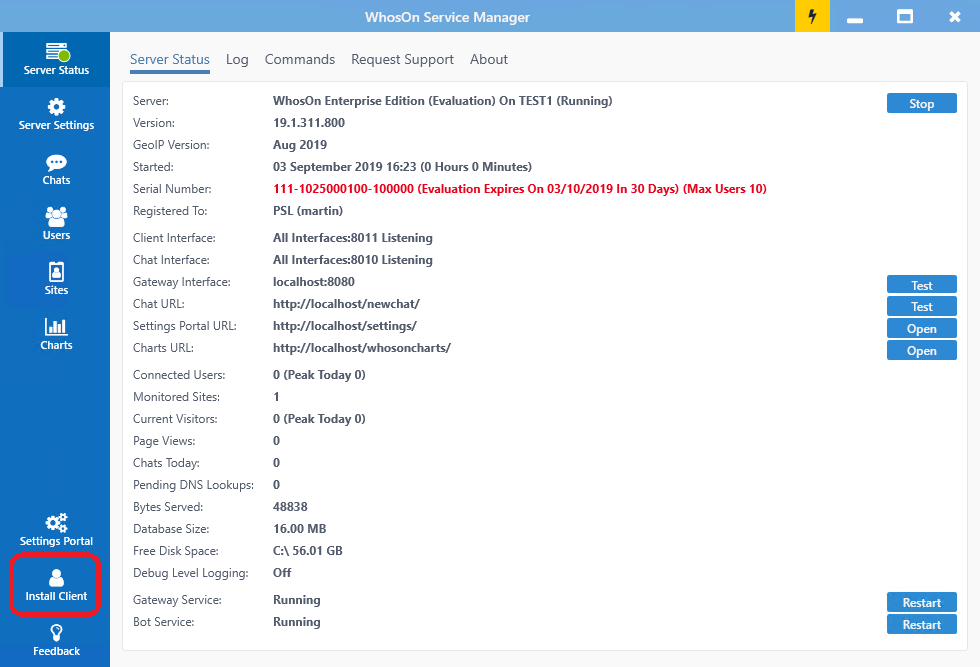
Getting Everything Running
Now that WhosOn has a database account, and the services are running you will be able to access the Settings Portal and the WhosOn Client from the server itself. An external connection to the server will not be possible until the next section, IP/DNS Setup, is completed; but you will still be able to configure sites and user accounts and use the chat from the server itself.
To configure User Accounts and Site Settings, you would need to login to the Settings Portal. At this stage, the
Settings Portal will only be accessible via a browser on the WhosOn Server, at
http://localhost/settings
You can login to the Settings Portal either with your System Administrator credentials, or if you created a user account when running the Service Manager for the first time, you can use that instead. Here you will be able to see the default site that was created for you, and you will be able to set up new sites and users if you require them now. You can see the Help guide for the Settings Portal, including how to set up site and users here.

To see how the chat works, you will need to have a User logged into the WhosOn Client. This can be downloaded by clicking the button shown below.
As with the Settings Portal, this will only work locally from the server until the next setup section is completed. You can log in with any existing user profile but bear in mind your super admin profile cannot take chats. To test the chat, you should log in with your admin profile, or any user you have created in the settings portal.
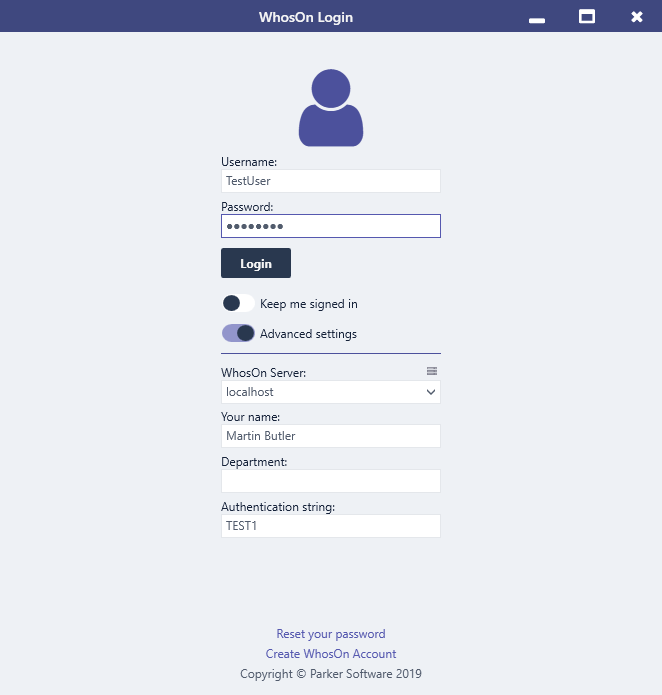
When testing locally on the server, you can use localhost for the server name. The Authentication
String is found in the Service Manager under Server Settings -> User
Connections. To be available for a chat, a User would need to set their status to available, and it
should be within the Opening Hours for your site, if you have set any in the Settings Portal.
Enter your credentials into the client, as in the example below.
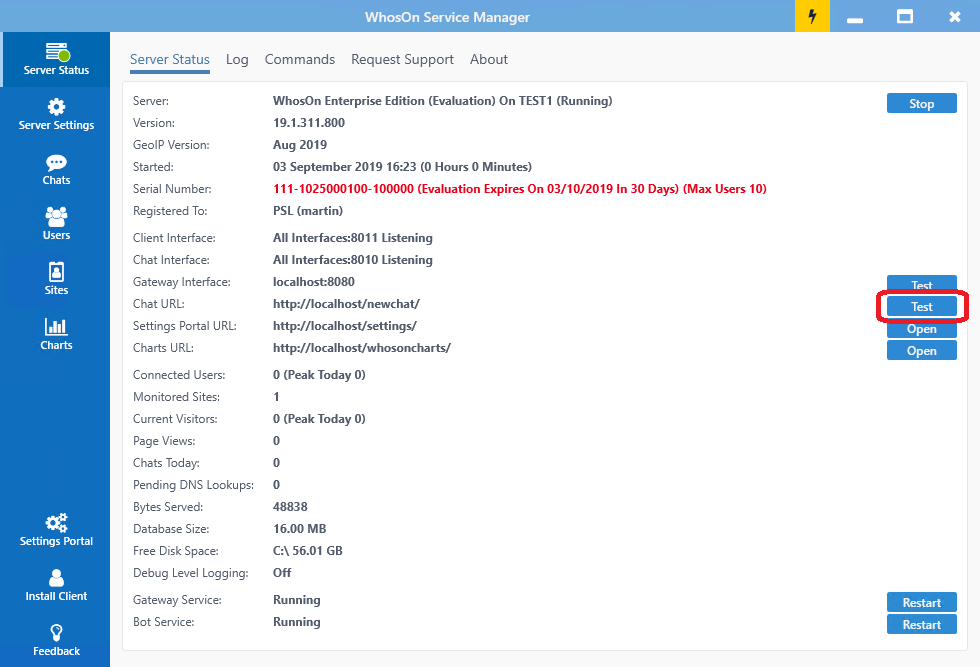
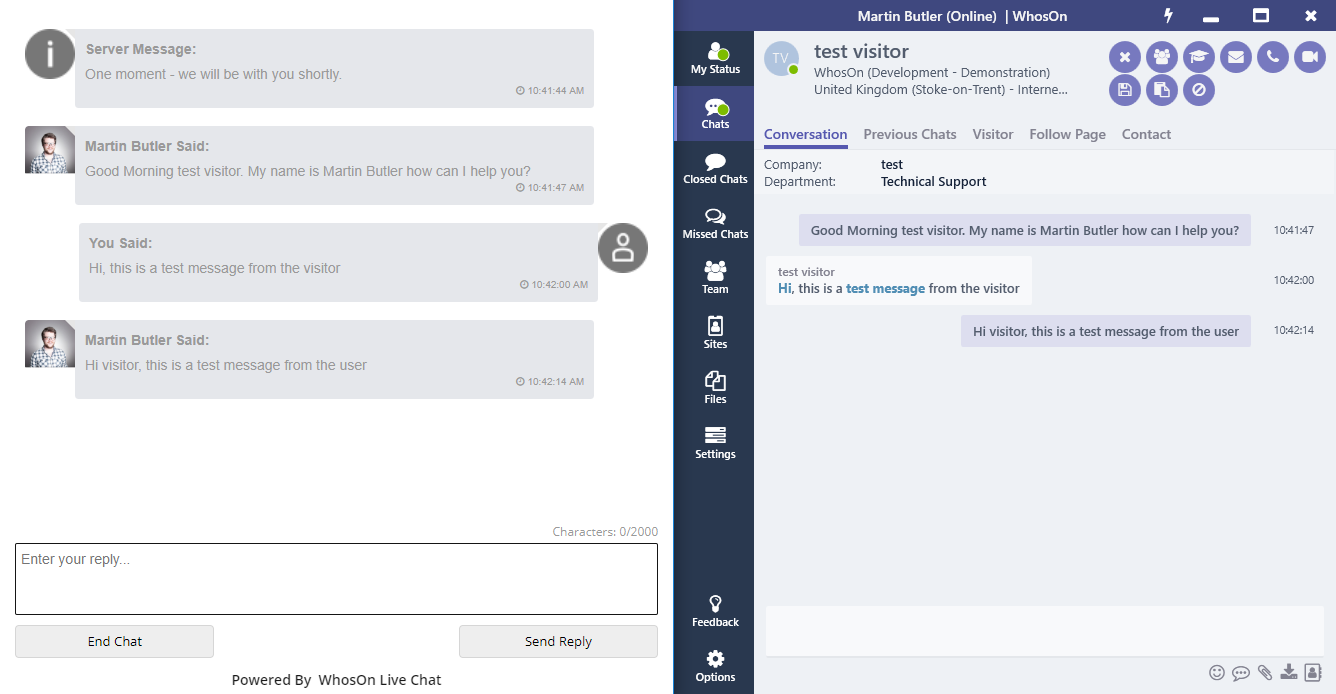
Now that you have a User logged into the Client, you can test the chat from a website visitor's viewpoint. The Service Manager contains a link to open your chat window, which will appear as it would to a visitor on your website. Click to begin the chat and you will be able to pick it up from inside the Client – you will now be seeing the chat from both a visitor and an agent point of view.
In the example below, the visitor's view of the chat is on the left, with the user's view on the right. Your view of the client may differ in layout, buttons and theme, dependent on version, integrations, permissions, and custom colours, etc.
Now that the chat is up and running on your server, you can use the Settings Portal to make changes to the chat window and test the results yourself without it being publicly available. Remember that for any changes to take effect any chats in progress should be closed and any test pages you have open should be refreshed.
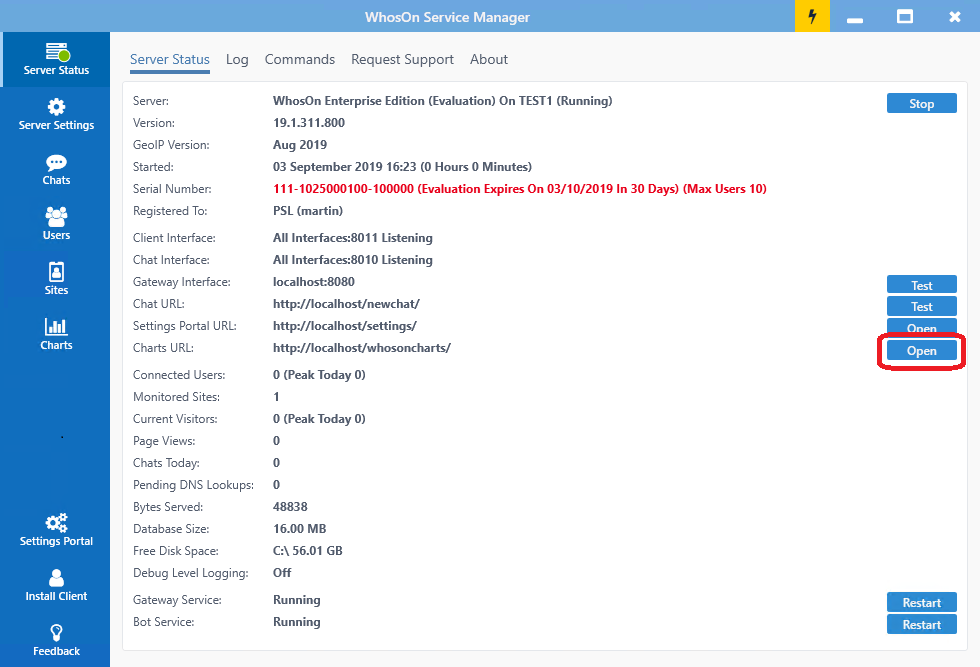
You may also test other features of WhosOn such as the Web Reports, which, like the Settings Portal, you can load from the Service Manager and access with an existing user account.
IP/DNS Setup
Once you are happy with how the chat works internally, you will be able to configure the chat to be publicly accessible. You can do this via the IP/DNS Setup Wizard under Set Public IP in the Server Settings. Setting an IP or DNS name here will automatically change the links to the chat pages on the server.
The IP or DNS you enter here may be visible to those who use the chat, so it is preferable to use a DNS, if you have one.
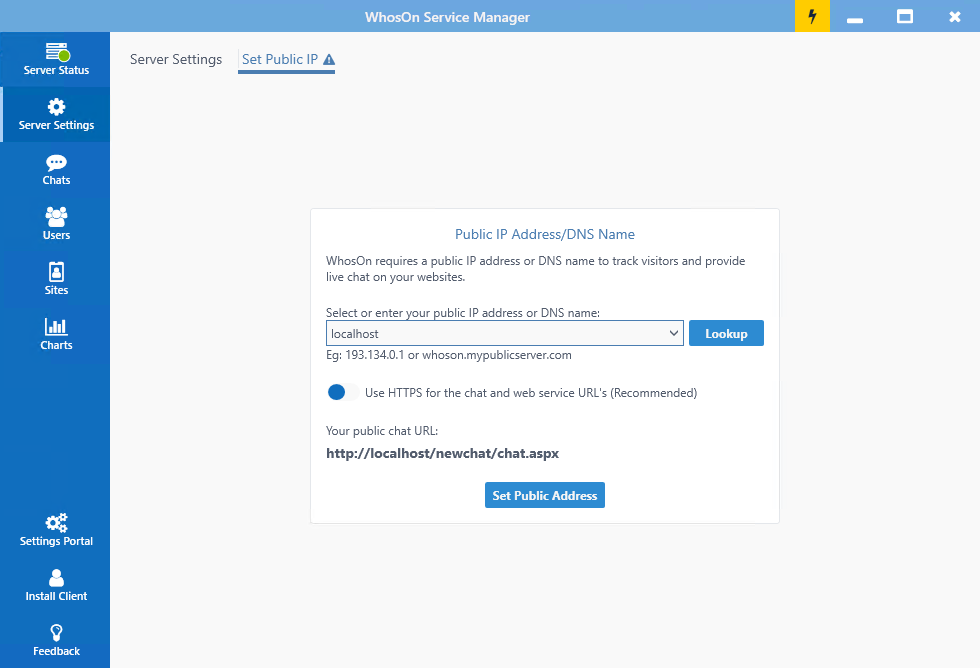
The IP address or DNS that you set must be available from outside your network. If not, users attempting to connect to the client and visitors attempting to chat will see errors.
Once it is configured, you can now test that the chat is publicly accessible. You can do this by copying the link given for the chat page and accessing it from a machine that is outside of the server's network.
You should also now be able to connect to the WhosOn Client from outside of the network by entering your new IP or DNS name into the WhosOn Server field. This is how your agents will connect to WhosOn from now on.
Setting Server Options
Before WhosOn goes live, there are some other setup steps that allow you to use all the features of WhosOn. These are setup in the Server Settings menu of the Service Manager.
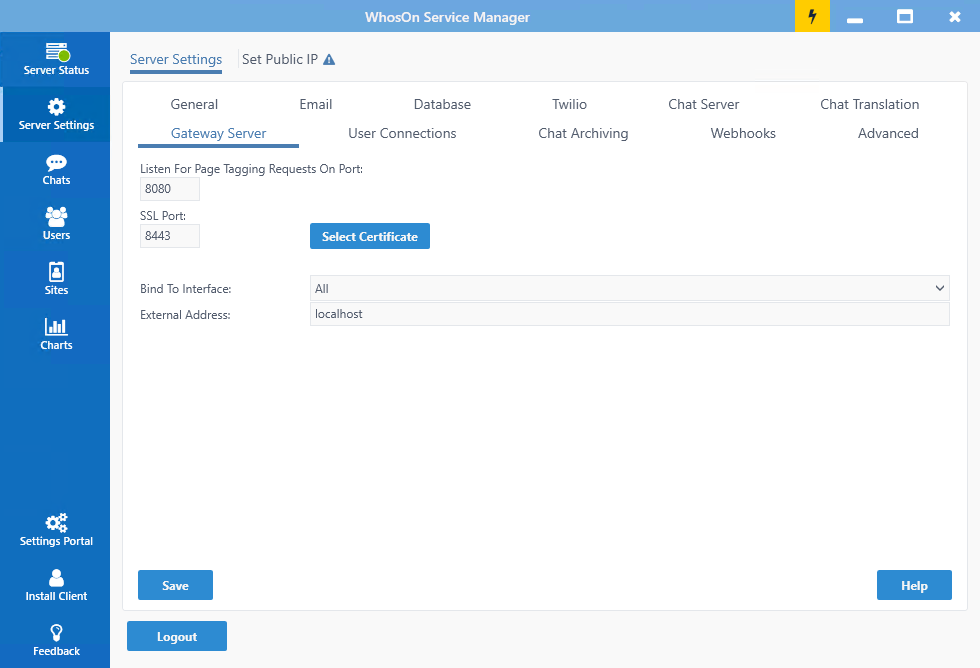
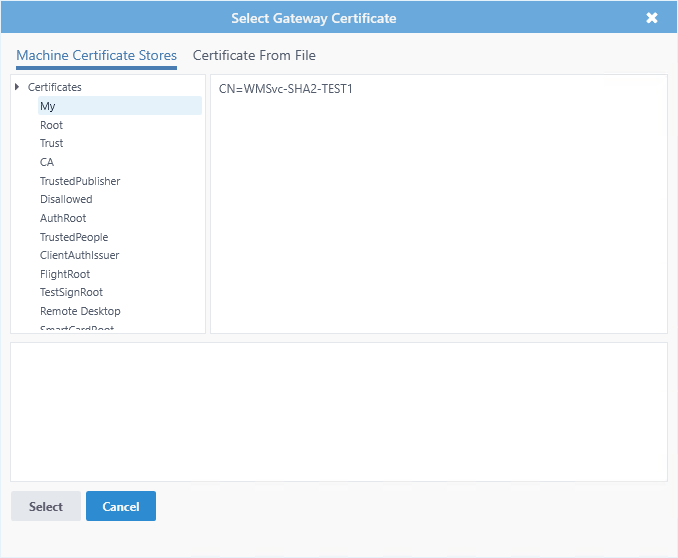
For WhosOn to work from secure pages on your website you will need to apply a security certificate to the server. The precise instructions for adding a certificate to the server will vary depending on the certificate, and we always recommend following the certificate provider's instructions for installation, but it will be added into WhosOn the same way – in the Server Settings, navigate to Gateway Server and use the Select Certificate button. This will allow you to select the correct certificate. The next time you restart the Gateway service it will load your certificate so that the chat can be used on secure pages, and you should see the certificate being loaded in the server logs.
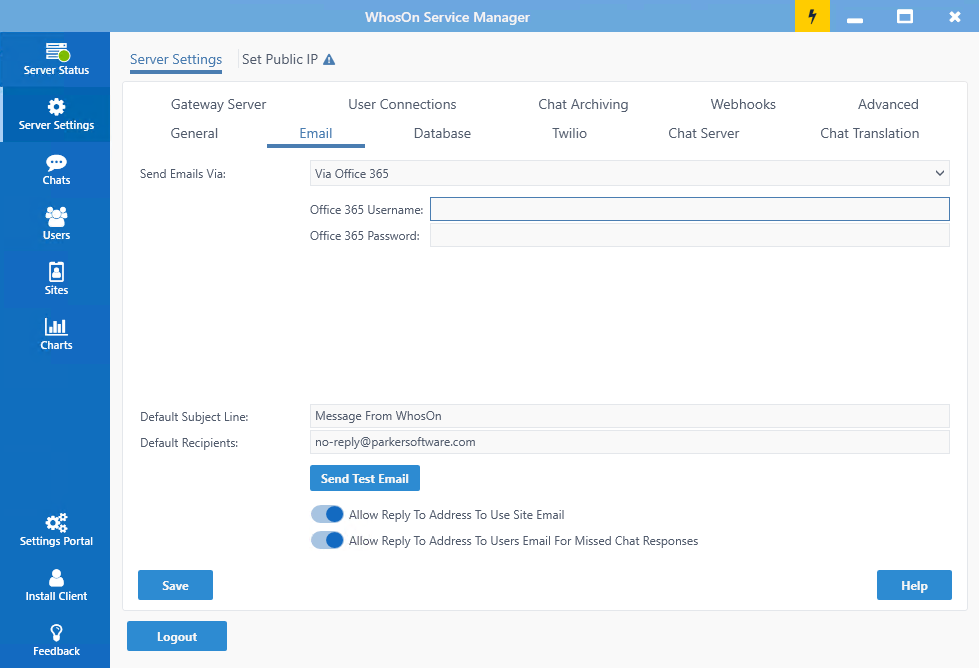
To be able to have outbound emails sent from WhosOn you will need to configure a Mail Server. In the Email tab of the Server Settings, you will have the option of using Office 365, your own SMTP provider, or a Sendgrid API key.
Once your details are entered, you can use the Send Test Email button to test that the settings are correct. These settings will now be used to send any outbound emails from WhosOn. This will include emailed transcripts to your visitors, setup emails and user account notifications to your users and scheduled reports to your admin users.
Going Live
Now that your server is prepared, there are only a few steps to get the chat on your website. If you have not done so already, now is a good time to check the domain and site settings within the Settings Portal are correct. You may want to setup all the user accounts you need, or at least set up Admin accounts for someone who will be setting up the users.
Any users that you do have will be able to download the Client and log in with the server IP or DNS, the authentication string and the user account details.
Once you have a site and users set up in the Settings Portal, the last step is to place the tracking code onto your site. This will begin tracking visitors and place a chat button onto your page, allowing your visitors to request chat and your agents pick them up.
Once your server is running and users are logged in, the tracking code is all that is needed for visitors to chat. Placing the tracking code on your web page will begin tracking website visitors, as well as dynamically displaying a chat button when your users are online. The properties of the chat button can be changed in the Settings Portal.
IIS & ARR Setup
ARR (Application Request Routing) can be used to have the Chat and Gateway services run over the standard http and https ports (80 and 443) on a single IP. This is the recommended configuration for servers with a single IP address.
To start, you will need to download and install the IIS extensions of URL Rewrite and Application Request Routing from Microsoft.
Open IIS, locate Server Farms in the Connections pane, and click Create a Server Farm.
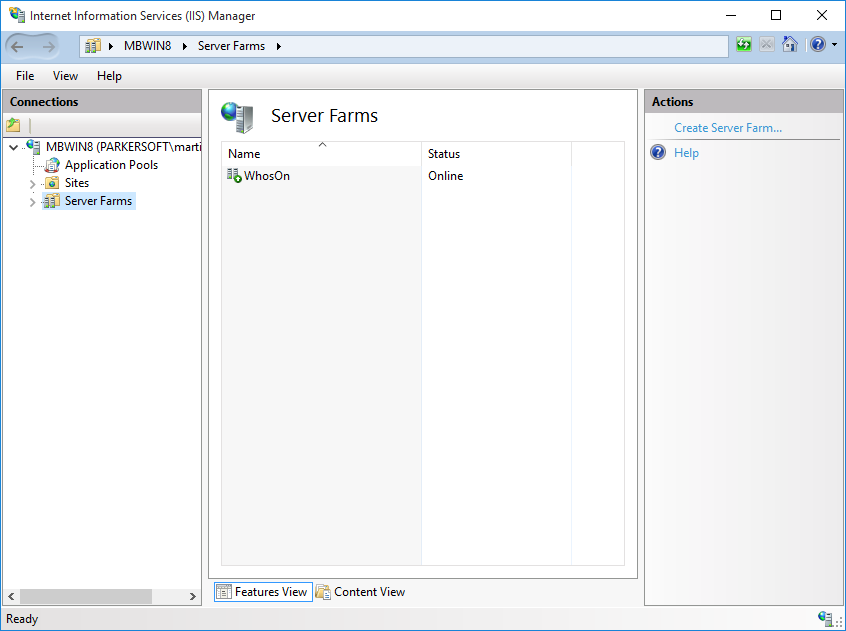
The name of this is not important, but check the Online check box. For the server Address add localhost and check "Online" then click Finish. You will then be prompted to add a URL rewrite rule, click Yes.
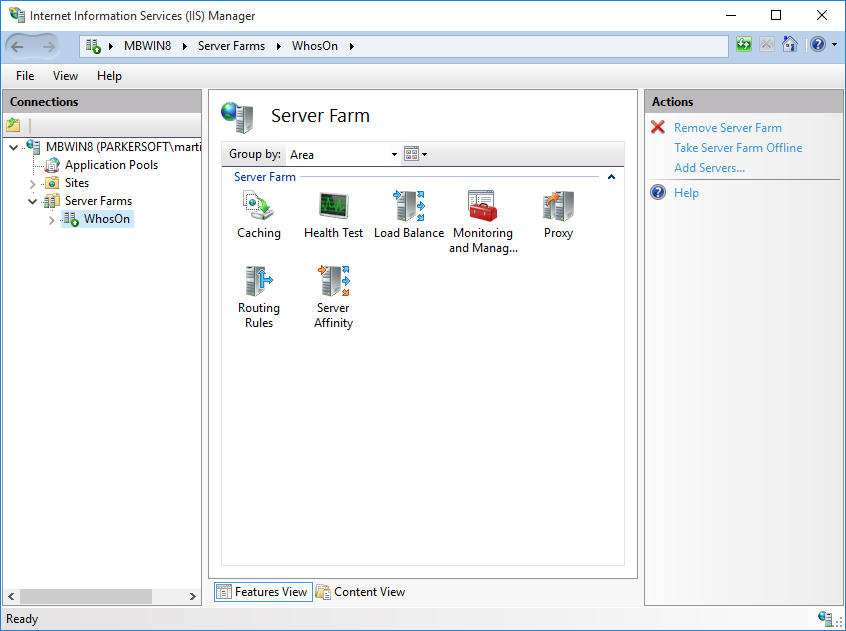
Within the new Server Farm options, go to Caching and uncheck "Enable Disk Cache" and set the "Memory Cache Duration" to 0. Now, go to Load Balance and set the "Load Balance algorithm" to "Weighted Round Robin". In Routing Rules, check "Offload SSL", then go to Proxy and uncheck "Include TCP Port from client IP".
Then click on the top-level IIS node and select "URL Rewrite" and modify the routing rule that is in place. If one does not exist, then add one (The name of this rule isn't important)
In the Match URL section:
Set Request URL to Does Not Match the Pattern
Set Using to "Wildcards" Set the Pattern to – */*
Under Conditions you need to add the following rules, one for each of the WhosOn applications:
{REQUEST URI} Does not Match the Pattern /whosoncharts
{REQUEST URI} Does not Match the Pattern /settings
{REQUEST URI} Does not Match the Pattern /newchat
{REQUEST URI} Does not Match the Pattern /webclient
{REQUEST URI} Does not Match the Pattern /clientws
{REQUEST URI} Does not Match the Pattern /data
Action type: Rewrite
Rewrite URL: http://Gateway{URL}
The Rewrite URL must match the name of the Server Farm above, in this case Gateway.
Append query string: Checked
Stop processing of subsequent rules: Checked
Once this is set up, open the WhosOn Service Manager then go to Server Settings - Gateway
Server and set the Bind To Interface to
127.0.0.1 On Software Loopback Interface.
Also change the Listen For Page Tagging Web Requests On Port to 80 and the SSL
Port to 443.
Then open Command Prompt with elevated permissions and enter in the following commands:
netsh
http
add iplisten {Server IP}
Then press CTRL+C
net stop http
Answer Yes
iisreset
Now start the WhosOn Gateway from the Service tab and check that it is working from the WhosOn Service Manager test page.
Server Logging
WhosOn contains a real-time log of server activity. This will give you a good idea of what the server is doing at
any given time, and let you know of any errors. This log appends the physical file PSL.log in your Settings Path
C:\ProgramData\Parker Software\WhosOnV7, to allow you to see historical records.
Monitor the size of the logfile periodically, if it is becoming too large for practical review, you may remove the file, or rename it, and WhosOn will immediately create another.

From the Command tab, you also have the option to Enable Debug Logging. This will add further messages into the log to allow you to better troubleshoot issues. It is not recommended to leave debug logging turned on for long periods of time as the logs may become unmanageably large.
Errors with WhosOn can often be resolved by stopped and starting the server under the Server Status tab and monitoring the log to make sure that it starts ok with no errors.
Webclient Setup
WhosOn includes a browser-based client for taking chats, similar for the most part to the desktop client. This can be configured with the Service Manager, and once set up any user will be able to take chats via their own browser without needing to install anything further. The webclient also benefits from regular self-updates with no action needed from the user.
There may be some variations in how the client works, and while the webclient is in development, certain features may be missing, however new features are being added all the time.
Configuring the webclient
First, configure the following within IIS.
-
Create a webclient URL rewrite rule.
-
Access Internet Information Services Manager (IIS)
-
Select
URL Rewrite -
On the right-hand actions pane, select "Add Rule(s)"
-
Select "Blank rule" under Inbound rules
-
Enter a name
WhosOn\_Webclient(the name is not important) -
Set Requested URL to
Matches the Pattern -
Set Using to
Regular Expressions -
Enter
(clientws.*)as the Pattern -
Under Action, set the action type to
Rewrite -
Enter
http://127.0.0.1:8013as the Rewrite URL
Now go back to the top level server in IIS and go into Application Request Routing within the Features view.

- Click into "Server Proxy Settings..." on the actions panel on the far right.
- Check "Enable Proxy" and click "Apply"
Next, you need to open the Windows Registry editor.
- Open RegEdit
- Navigate to
HKEY\_LOCAL\_MACHINE\SOFTWARE\WOW6432Node\ParkerSoft\WhosOn\7\Settings - Create a new string value with the Name:
WebClientSocketURLand Data:wss://{yourdomain.com}/clientws - Create a new string value with the Name:
WebSocketClientURLand Data:wss://{yourdomain.com}/clientws
Configuring the WhosOn Service Manager
-
Go to Server Settings
-
Select Web Client
-
Enable Client WebSocket Interface
-
Toggle " Use IIS Proxy" on
-
Set the External WebSocket Address to
{yourdomain.com}/clientws/ -
Toggle "External WebSocket Secure" on
The webclient should now function from any modern browser, {yourdomain.com}/webclient/.
Advanced Pre-requisites
If you are installing WhosOn onto a machine with no internet access you will need to ensure that the following products are installed prior to installing WhosOn.
- .NET Core Windows Hosting Bundle, latest release: https://dotnet.microsoft.com/en-us/download/dotnet/3.1
- Visual C++ Redistributable, both x86 and x64, latest release: https://docs.microsoft.com/en-us/cpp/windows/latest-supported-vc-redist?view=msvc-170
- IIS, with the following selected components:

- .NET Framework 4 with the following selected components:

- URL Rewrite: https://www.iis.net/downloads/microsoft/url-rewrite
- Application Request Routing: https://www.iis.net/downloads/microsoft/application-request-routing
Updating to 19.2.195.100
To ensure a smooth transition to the new version (19.2.195), please follow these straightforward steps:
Start by creating backups of the following directories:
C:\ProgramData\Parker Software
C:\Program Files (x86)\WhosOn Installable
Uninstall the Current Version: Navigate to 'Add and Remove Programs' on your computer and uninstall the existing WhosOn software.
Clean Up: After uninstallation, go to C:\Program Files (x86)\WhosOn Installable and delete any
remaining files and folders.
Install the New Version: Download and run the WhosOn 19.2.195 installer (.exe file). This process will also include installing the necessary .net bundles.
Restart Your Computer: Once the installation is complete, please reboot your machine to ensure all changes take effect.
Verify the Installation: After restarting, check that the WhosOn service is running properly through the service manager.
Test the New Features: Try out the chat, settings portal, data, and web client using the links provided in the service manager to ensure everything is working as expected.
In Case of Issues: If you encounter any stability problems, here's a quick fix:
Open the Task Manager and stop all WhosOn services.
Rename the backup folders to their original names.
Restart the services to revert to the previous state.
We hope you enjoy the new version of WhosOn! Should you need any assistance, please don't hesitate to reach out to our support team.
Technical Support
For any queries, please contact Technical Support via Live Chat here or on our website, phone during business hours, or via email.
UK: 0330 0882 943
US: (800) 680 7712
E: -- support@parkersoftware.com
W:
-- Live Chat
For more information and news on our company and other products, please visit Parker Software.